• Encyclopedia
  • How to write the .img file to a MicroSD card

    Posted on by Alex
  • For Windows Users
  • Decompress the file using P7Zip.
    You will use Etcher to write it next. Please go to their website to download and use it.

    Download and install Etcher
    Run Etcher
    Select the PiDash Image you downloaded
    Select the drive of your SD card
    Click Flash!

  • For Linux users
  • Find the device (eg: /dev/sdb1) you need to write to by using blkid or mount.
    Double check that you have the correct dev path for your SD card (eg: /dev/sdb1).
    Unmount the SD card and all its partitions by using umount /dev/sdb?.

    Decompress the file:

    tar xf “PiDash image file.tar.gz”

    Write the image using the below command.

    sudo dd if=”PiDash image file name.img” of=/dev/sda status=progress


  • NexGenEFI Digital Dash Community Edition

    Posted on by Alex

    Initial Requirements

    DISCLAIMER: This software is provided without any warranty expressed or implied. Use of this software is all on you bud.
    There may be bugs that I need to fix, so check back regularly for updates.
    Please check on my Facebook page for the latest news. This site is updated last with news.

    First and foremost you need to read what you need when it comes to hardware. Read this first!

    SPECIAL NOTES: Speeduino Serial
    These instructions are based on Mega code for the NexGenEFI Digital Dash Community Edition and Speeduino 0.4.4d (It should not matter what version Speeduino you have).
    You will require the Seeed Studio CANBus Shield 2.0 even though you are using Serial. The SD Card slot on the Shield is utilized to save various settings for the screen.
    Important note – you may have issues with secondary serial when you are connected to TunerStudio via USB. Note also that some user designed boards already use the secondary serial for Bluetooth connections. Before embarking on the project check that your secondary serial is free for use.

    Ensure that secondary serial is enabled via TunerStudio (Default is off). The only setting change required is to turn on the secondary serial, other settings in the window should be left as is. See here: https://wiki.speeduino.com/en/Secondary_Serial_IO_interface. It should be noted that what Speeduino thinks is secondary serial is actually serial 3 on the mega.

    No official Speeduino boards break out the serial 3 pins on the Mega to the Speeduino board. This mean that you will have to direct connect to pins 14 and 15 on the mega. Generally easiest to solder wires to the rear of the Mega and provide flyleads.

    Connect as follows:
    NexGenEFI Digital Dash Mega Pin 15 to Speeduino Mega Pin 14.
    NexGenEFI Digital Dash Mega Pin 14 to Speeduino Mega Pin 15.

    Follow the rest of the instructions below.

    Software Requirements

    Download AVRDUDESS for Windows, if you’re using Windows. This is to upload the compiled dash to the Arduino.
    Clicky here to get it.

    Format your microSD card for the Nextion software
    Buy a MicroSD card and Format it in Windows to FAT32. Basically put in your Windows machine, select Format.

    Where you’re at right now
    1. You have your hardware.
    2. You’ve installed AVRDUDESS which enables you to copy the compiled NexGenEFI Digital Dash Community Edition to the Arduino Mega.
    3. You’ve formatted a microSD card which you’ll copy the NexGenEFI Digital Dash Community Edition layout to.

    Download the NexGenEFI Digital Dash Community Edition version

    NexGenEFI Digital Dash Community Edition Downloads Page

    Download the Nextion Display layout

    NexGenEFI Digital Dash Community Edition Downloads Page

    Configure CAN using TunerStudio (MS3)

    We need to send data from the MS3 box to the Arduino CANbus Shield. Change your settings to these. Ensure your base identifier is 1520.

    Installing CANBus Shield onto the Arduino Mega

    Very simple. It only plugs in one way. Look at my picture, look at what you have. Plug it in and ensure its firmly seated. I have a microSD card plugged into the CANbus Shield, ignore that. Look at the wiring harness that comes with the Nextion display. Same colors, plug into the same pins like in the pics.

    Wiring Display to the CANBus Shield

    There are 4 wires to connect.

    1. Red wire from the display to a 5V power source.
    2. Black wire from the display to the GND.
    3. Blue wire from the display to the RX1 PIN 19 on the Arduino Mega board.
    4. Yellow wire from the display to the TX1 PIN 18 on the Arduino Mega board.

    You can add some hot glue to hold the pins in.

    Grove GPS v1.2 connection to Arduino Digital Dash
    See above pics.

    1. Yellow from Grove GPS to Pin 17 RX2.
    2. White from Grove GPS to Pin 16 TX2.
    3. Red from Grove GPS to CANBus Shield 5V.
    4. Black from Grove GPS to CANBus Shield GND.

    Powering the NexGenEFI Digital Dash Community Edition

    The Arduino Mega, Grove GPS v1.2, CANBus Shield 2.0 can all be powered off of the Mega. You will need to power the Mega via the barrel plug on the side as pictured below. Its a 5.5mm/2.1mm DC barrel plug, center positive, Recommended 9V-12V @ 2A.

    USER FEEDBACK on POWER OPTION:
    Power options are varied. He used a 12v-5v regulated supply to feed the NexGenEFI Digital Dash Community Edition Mega and the Nextion display itself from it. Connect to vin and GND on the Seeed Studio CANBus Shield 2.0.

    OR the below. Just ensure you can get to the USB connection. This will be utilized to update the software when a new release is ready.

    1. 12V to 5V USB.

    Installing the NexGenEFI Digital Dash Community Edition software

    Open AVRDUDESS.

    1. Select “Wiring” as the Programmer.
    2. Ensure your Arduino is connected via USB to the laptop/computer.
    3. You are connecting to COM1,2,3 or 4. NOT USB. This is a serial interface even though its connected via USB. Mine happened to be COM4, so I selected it.
    4. On the top right for MCU, select AtMega2560
    5. Flash. Click the 3 dots to the right and find the .HEX file you downloaded, select it.
    6. Click GO. It will upload the code to the Arduino and you should see a similar message in the black box like I have in my screenshot.
    7. Arduino is ready.

    Copying Nextion layout

    1. Insert that microSD card in and the .TFT file you downloaded earlier, copy it to the microSD card.
    2. At this point, you have the display plugged into the CANbus Shield, everything is powered on.
    3. Insert microSD card into the Nextion Display.
    4. Unplug red wire from display that is connected to the CANbus shield.
    5. Plug red wire back in.
    6. Nextion display will say, uploading or whatever. It will copy the .TFT file to the display.
    7. Once complete, remove microSD card.
    8. Power cycle the Arduino and you should see the a layout.
    9. Press the SHIFT LIGHT and CONFIGURE your ECU, Warning lights and DEFAULT Layout. If you dont, the dash will not function properly. At the time of this writing, I may create defaults if there are none. Double check them.

    Connecting to the MS3 / Speeduino CANBus / OBD2

    CANL to CANL on the CANbus Shield
    CANH to CANH on the CANbus Shield

    Start up your car!


  • NexGenEFI Digital Dash Community Edition Downloads

    Posted on by Alex

    Download the NexGenEFI Digital Dash Community Edition.

    You will need to UNZIP the files.

    Current version which you can see in the CONFIG screen is v0.09i as of 03/21/2023.
    This is the compiled firmware for the Community Edition which runs on the Arduino MEGA: NexGenEFI Digital Dash Community Edition Download

    Download the Nextion Display layout

    7″ Nextion Intelligent Series. Download 7″ Display layout

    Layouts included below. Last image is the CONFIGuration screen.


  • NexGenEFI Digital Dash Community Edition Hardware Requirements

    Posted on by Alex

    ** My layouts will ONLY be available for the 7″ and 10″ INTELLIGENT series, maybe the 4.3″ INTELLIGENT series if there is a need. I can support other Nextion INTELLIGENT series displays but it requires manual editing of layouts which is a lower priority. **
    ** REQUIREMENTS might change, best to read up on the Official FB Page. **

    NexGenEFI Digital Dash Community Edition Hardware Requirements

    32gb/64gb microSD card: REQUIRED!

    1. Lexar 32gb $11.99

    Arduino Mega R3

    1. Elegoo MEGA R3 $19.99

    You can purchase a 7″ INTELLIGENT Nextion display, these SPECIFIC MODELS. If you want a bigger/smaller Nextion display, get with me on the FB Page.

    1. Nextion 7″ INTELLIGENT Series display

    SeeedStudio CANBus Shield 2.0, even if using Speeduino SERIAL you NEED THIS ALSO!

    1. SeeedStudio CANBus Shield 2.0 $27

    Grove GPS v1.2 with the SIM28 chip

    1. Purchase that here. If its sold out, you can purchase elsewhere.

    POWER CONSIDERATIONS

    The Arduino Mega, Grove GPS v1.2, CANBus Shield 2.0 can all be powered off of the Mega. You will need to power the Mega via the barrel plug on the side as pictured below. Its a 5.5mm/2.1mm DC barrel plug, center positive, Recommended 9V-12V @ 2A.

    OR the below. Just ensure you can get to the USB connection. This will be utilized to update the software when a new release is ready.

    1. 12V to 5V USB.

    Powering the Nextion Display

    It only requires 5V. There are 4 wires to the Nextion. The RED is 5V power, BLACK is ground.


  • PiDash by AB Updater Install Notes

    Posted on by Alex

    Super simple to install. I strongly urge you to watch these videos before you even ask me anything. It explains how to connect to the internet and so on.

    Basic steps:
    1. Connect to the internet
    2. Open up a Terminal
    3. Type the following in the Terminal screen and hit return:
    wget --no-check-certificate --user-agent=Mozilla https://www.bartonekdragracing.com/pidashupdates/pidash_updater.run

    4. Type the following in the Terminal screen and hit return:
    chmod +x pidash_updater.run

    …If you’ve watched the videos, you’re good to go. Enjoy!


  • PiDash Network Troubleshooting

    Posted on by Alex

    This page assumes:
    1. You’ve used Config WIFI to setup your connection. If not, please go do so.

    There are several reasons you cannot connect.
    1. Incorrect spelling of your home/shop/whatever hotspot you’re trying to connect to.
    2. Incorrect key used (WEP, WPA-PSK).
    3. Typo in your password.
    4. All of the above is fine, but your Windows box says it cant connect. What gives?

    To test wireless settings, go ahead and click on “Enable Network”

    Click on Terminal which will open up LXTerminal.

    Type the following command. You will see a list of hotspots your PiDash can see. Use the scroll bar on the right to scroll up if needed.

      iwlist scan |grep -i ssid

    What you’re looking for is YOUR HOTSPOT. Lets use “2WIRE732” as an example, we’ll say this is your hotspot. Make sure you typed it correctly in Config WIFI, just as it is shown in that command output. In Config WIFI, it will need to be IN QUOTES along with your password. If this is correct, keep going.

    Next thing to check is, which key_mgmt value you need to use in Config WIFI. In the same terminal session type:

      iwlist scan

    Scroll thru that list and find YOUR HOTSPOT, in my example it is “2WIRE732”. They all start with “Cell XX”.
    What you’re looking for is if it says WEP, or WPA/WPA2 and then the Authentication Suite. In my example it says PSK. Then go back to Config WIFI and use 2WIRE732 (with the quotes) for YOUR SSID, WPA-PSK for key_mgmt (that is the default in the template), then finally YOUR WIFI PASSWORD for psk (in quotes).

    If you CAN connect to the PiDash either with Direct or via WiFi but cannot access the PiDash Share

    There have been instances of Windows systems not being able to hit the PiDash either the “Enable Direct” option or “Enable Network” option.
    Most instances are because Enable Guest Logins is not enabled. To enable that do the following:

    Re-Enable the guest account fallback for SAMBA:

    1. Go into Local Group Policy Editor
    2. Navigate into Administrative Templates – Network – Lanman Workstation.
    3. Then the Setting : Enable insecure guest logons has to be set to “Enable”.
    Enable : Allow guest usage and solve the problem
    Disable : Will not allow guest usage and provide this problem.


  • PiDash Wicd Networking

    Posted on by Alex

    Ensure that WiFi Direct is not enabled by clicking on Disable Direct on the desktop.

    The new method with WiFi Transfers is using a GUI application called Wicd. You will need to click on ENABLE NETWORKING BEFORE continuing. Always make sure to DISABLE NETWORKING when done and then click DISCONNECT from wireless in the Wicd application.

    There are two methods which you can access this application.

    Bottom right corner there is an icon with two desktops. Left Click once.

    The second way to access this screen is to go to the menu on the bottom left.

    Wicd WiFi screen is shown.

    You will NEED TO KNOW THE FOLLOWING. The wireless connection you’re trying to connect to, the password and the encryption type. You will get all of this information from your router.

    In the below screenshot WPA 1/2 is a dropdown. Select the type of encryption you have set in your wireless router.
    Key is your wireless password. To make sure you type it in correctly, click on the checkbox. Once done, hit OK.

    After you hit OK, you will be back at the main screen. Find your hotspot and click CONNECT.

    You will be connected if your information is entered correctly. Your IP that you will connect to from File Explorer in Windows will show up where indicated by the red arrow. You will also notice the icon on the bottom right is green. MAKE SURE YOU CLICK DISCONNECT WHEN DONE, otherwise WiFi Direct will NOT WORK.


  • PiDash WiKi

    Posted on by Alex

    Follow me on FaceBook

    (This page is updated as I get time and/or fix bugs/add features)


    • PiDash by AB NEWS


    10/03/2023 v1.6 is at 80% completion.  It boots up, loads TunerStudio. VNC is there so you can remote into it to tune your vehicle.  The “USB keyboard/mouse not working” is because the image needed updating.  BTW, the PiDash is moving to the NexGenEFI website.  I’ll update this page with the link to the updated PiDash version.


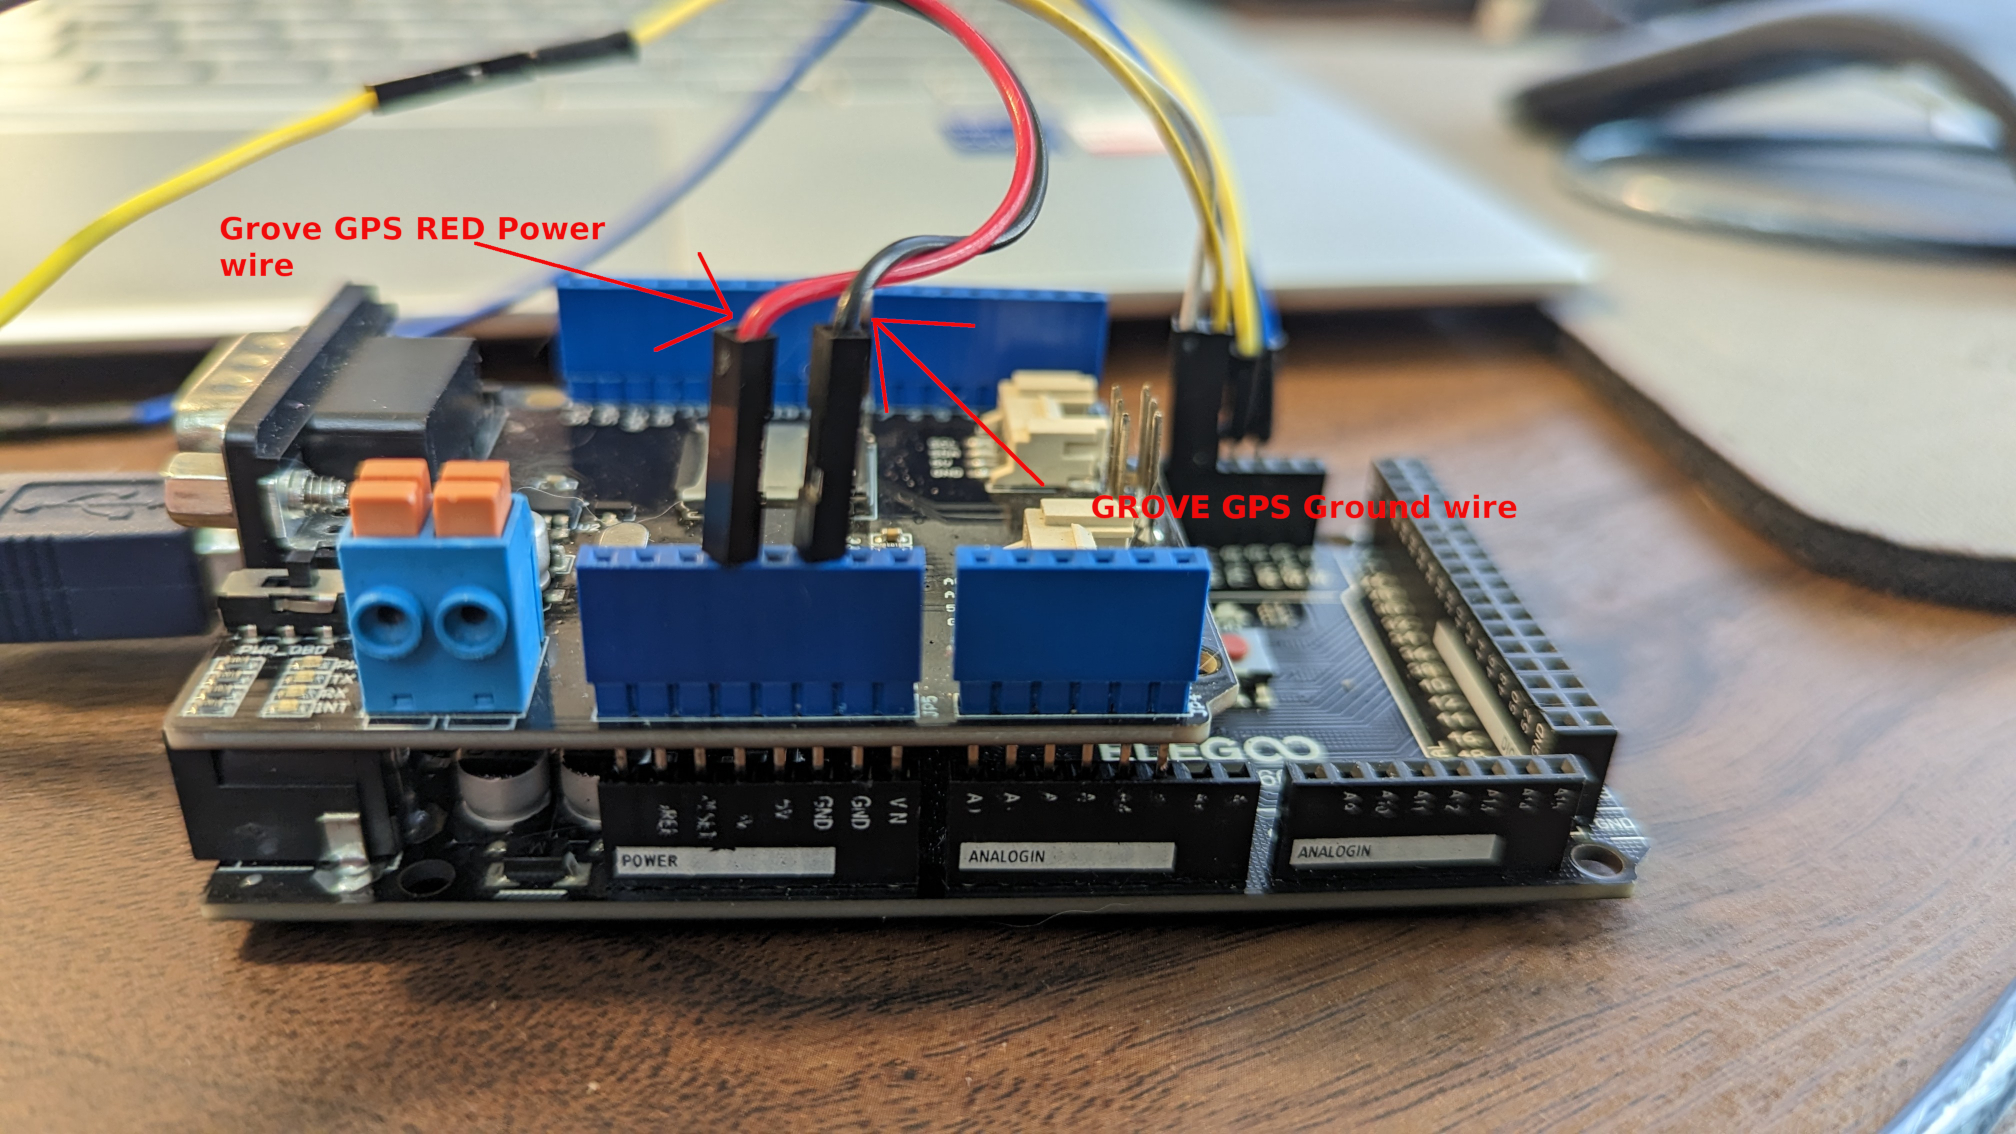
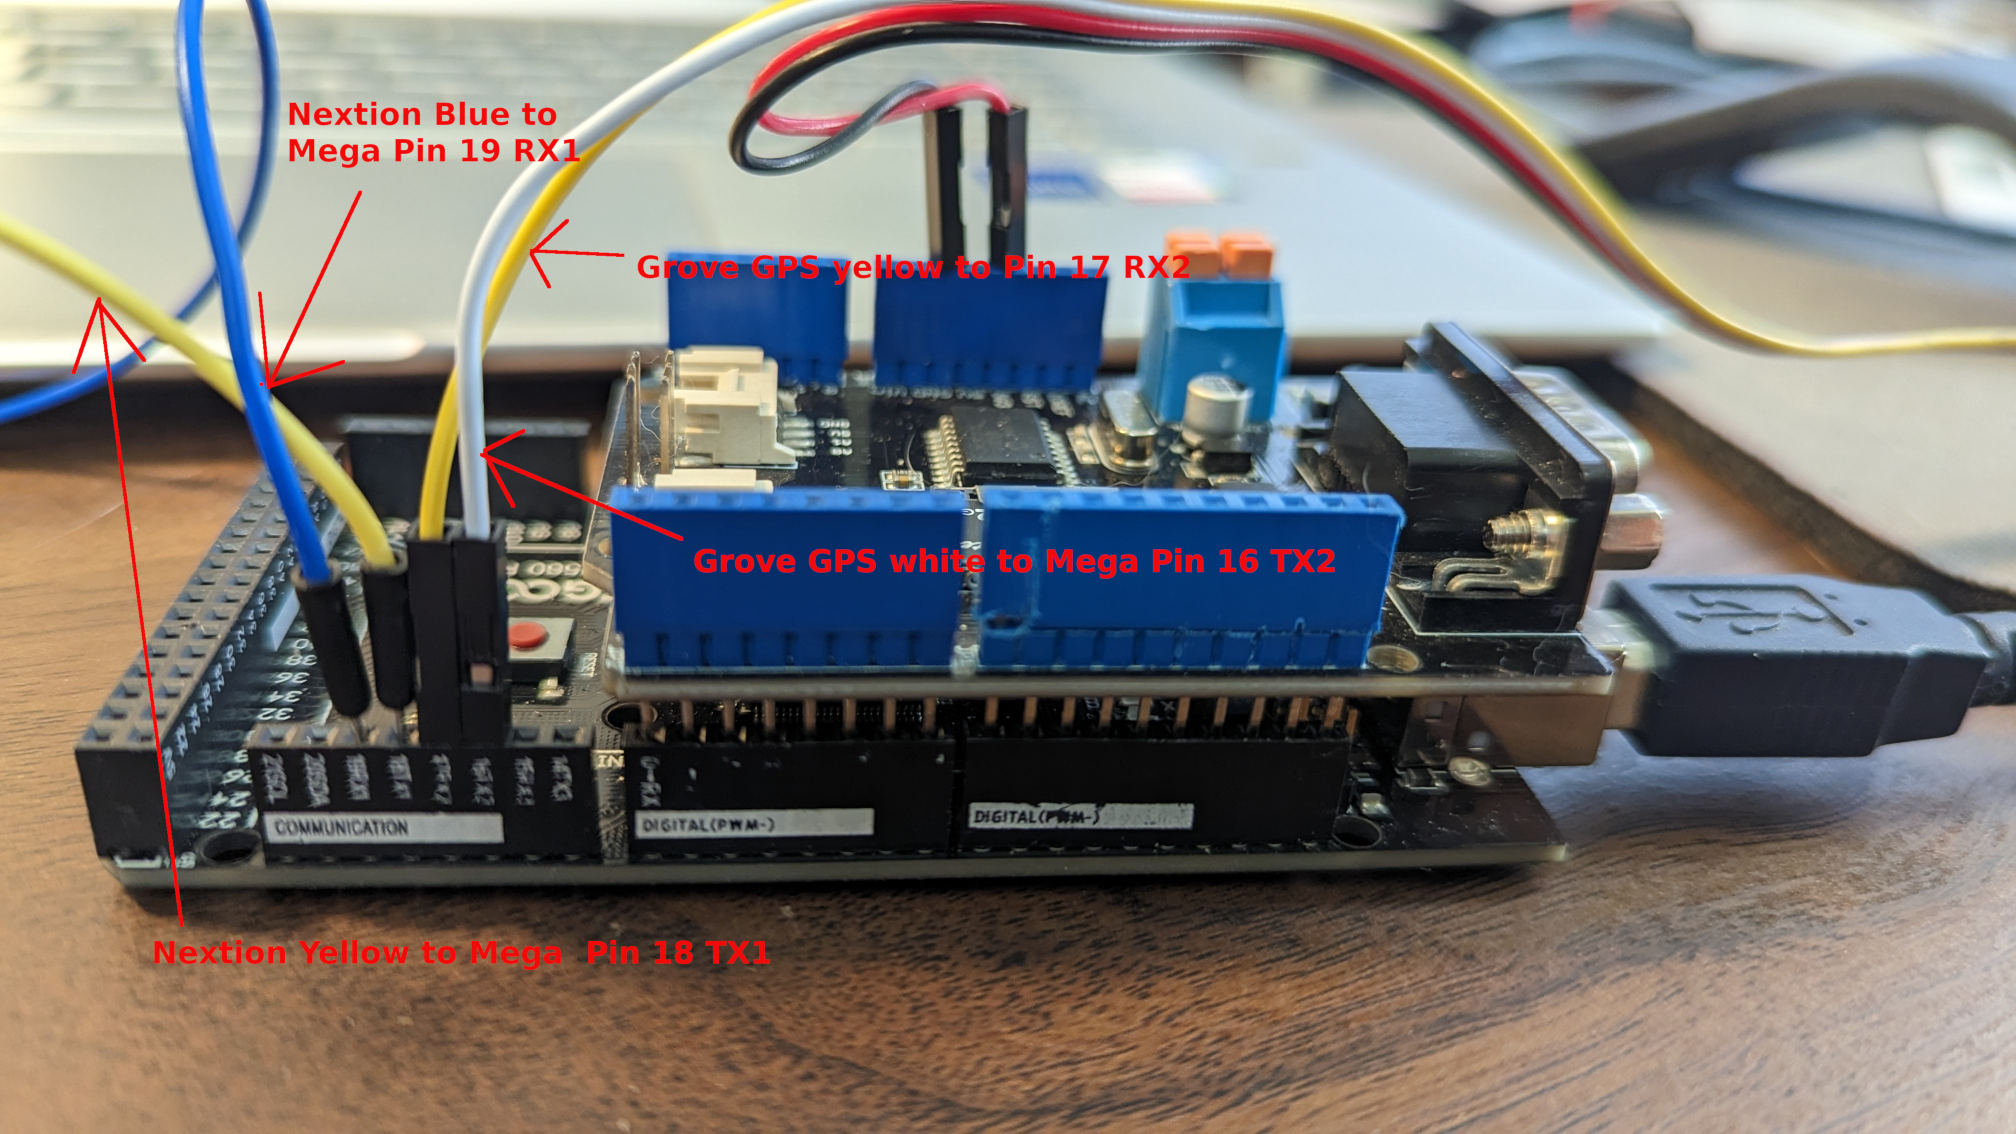
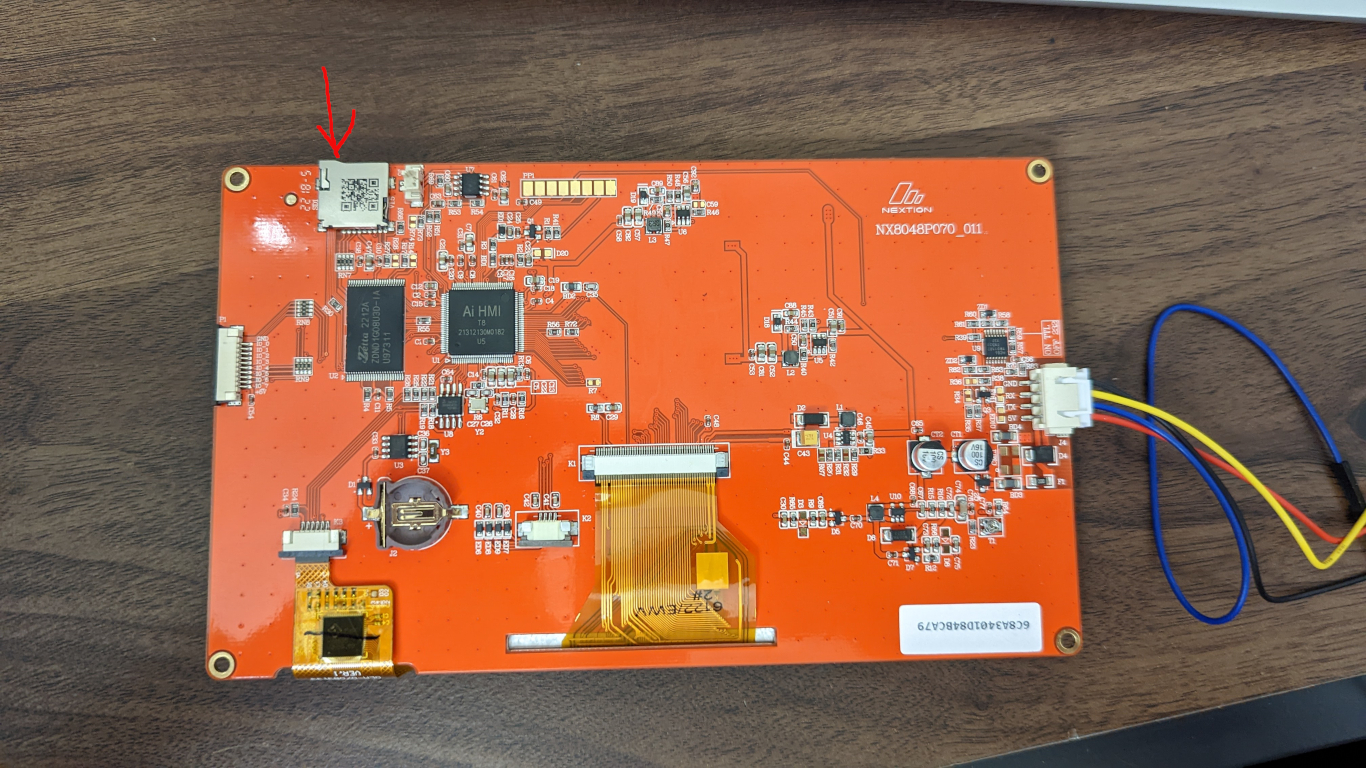
    04/30/2021 BUG FOUND in GPS Time. For now, dont use it. I recommend using an RTC module. Please look at this pic. RTC module is the red board. What does this mean? I means that if you enable GPS Time, the MPH feature in TunerStudio will not be read from your GPS module. So dont use GPS Time if you want to use MPH. It also means your LOG FILES will have a weird date from the past. You might be able to use “Silently auto name log files” feature in TS though.
    03/06/2021 06/14/2021 Add support for a RTC (Real-Time Clock). I’m finding acquiring GPS time is too slow. **Already done, need to add to new build** New build will REMOVE GPS Time issue listed above!

    04/07/2023 Updated some files on the 1.5.3 version.   If you get the ‘start4.elf’ error, this fixes it.


    • OLD NEWS – news from above rolls down here and eventually gets deleted.


    • Latest STABLE PiDash by AB Version, INSTALL NOTES


    You can always download the latest version specifically on this page. Updates may happen frequently depending on the criticality of the bug or demand of a specific feature. Versions PRE-1.5 are no longer supported.

    To start using PiDash by AB do the following if you DO NOT HAVE PiDash 1.5.3 installed, if you’re on 1.5.3 skip past step 3 to upgrade:
    1. Download Version v1.5.3 DOWNLOAD HERE
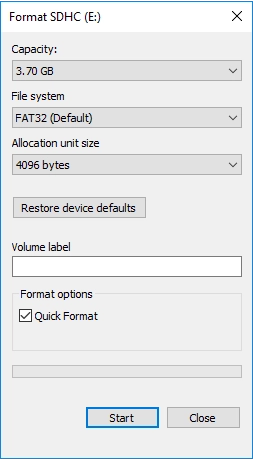
    2. Write the .IMG to an SD Card: How to write the .IMG file to a MicroSD Card.
    3. Upgrade 1.5.3 to 1.5.3.1, start reading below.

    Upgrading to v1.5.3.1:

    08/28/2020 Version v1.5.3.1

    Changelog:
    1. Added ‘unclutter’. It hides the mouse pointer after a few seconds of no movement.
    2. Updated Enable Direct and Disable Direct scripts.
    3. Updated network config to address HotSpot bug.
    4. Created pidashver script which will tell you what version of PiDash you are running, along with Release notes.
    5. Created pidashsu script which will update the main update script. Can be run at any time.
    6. Created /etc/pidash which will be used to keep various PiDash files now and over time.
    7. Updated my website to support updates to PiDash via command-line download.

    DOES NOT REQUIRE A IMAGE DOWNLOAD. You must be running version 1.5.3 for this update.

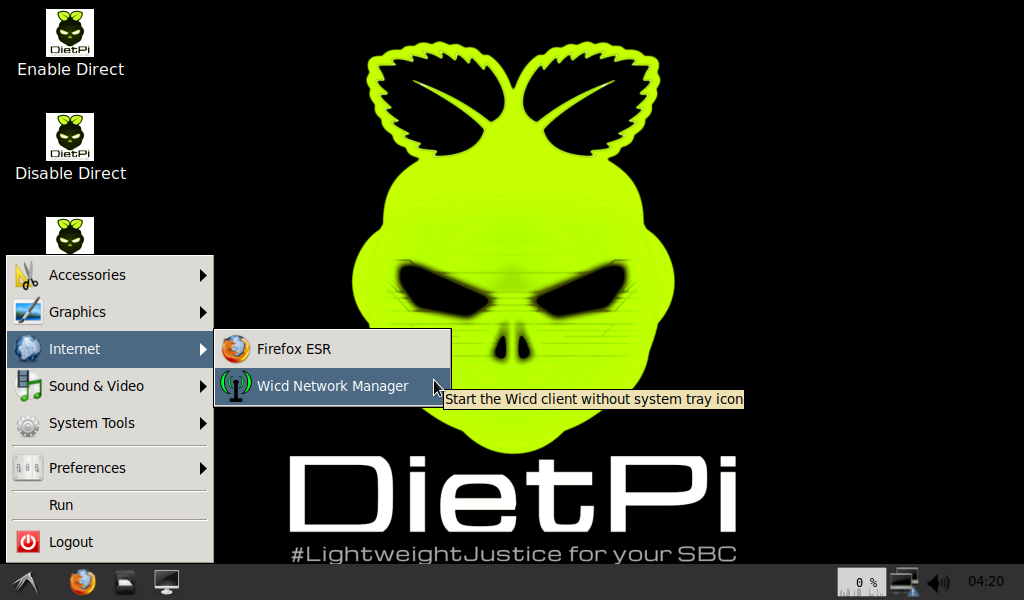
    Make sure you are connected to the internet. Click HERE for PiDash networking instructions.

    From a terminal, type the following. If you COPY AND PASTE, make sure the dashes are copied correctly. There are TWO DASHES aka MINUS SIGNS before “no-check-certificate” and before “user-agent”. Otherwise you’ll get an error message:
    wget --no-check-certificate --user-agent=Mozilla https://www.bartonekdragracing.com/pidashupdates/update_pidash.sh

    Once it downloads the update script, type the below:
    chmod +x update_pidash.sh

    To upgrade from 1.5.3 to 1.5.3.1 type the following:
    ./update_pidash.sh

    • Documentation changes

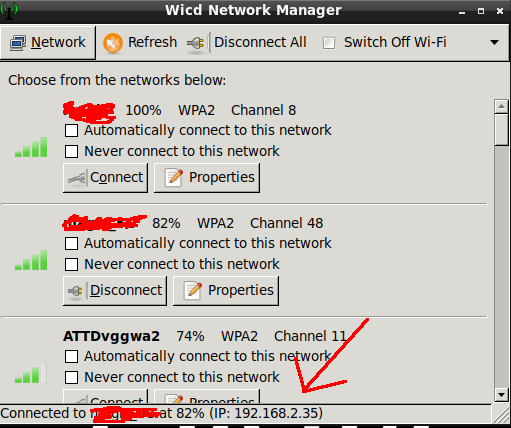
    05/02/2020 Added a screenshot in the PiDash Wicd Networking page. Screenshot shows where to look to find the PiDash IP after connecting to your wireless router/hotspot.

    03/06/2021 Link to PiDash by AB Updater install notes. Click here to read


    • About

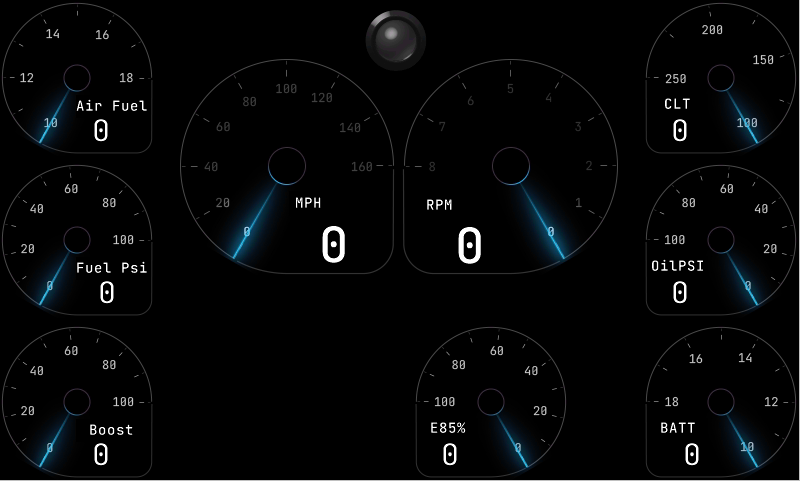
    1. PiDash was created out of necessity since I did not want to carry around a laptop to monitor my Turbo Camaro.
    2. PiDash consists of DietPi with some modifications to remove unneeded resources and settings which are enabled on an as-needed basis.
    3. PiDash is managed by “PiDash by AB Updater”, the software I wrote to manage features in the PiDash.
    4. PiDash is FREE. If you use it, a “Thank you!” is as good as money!
    5. PiDash probably has some bugs, please REPORT them by clicking HERE or post it on the PiDash by AB Facebook page.


    • What is my build using?

    Raspberry Pi4 (2GB version is fine) $45
    16gb microSD card $6
    Longrunner 7″ touch screen $62
    Windshield mount (if thats what you’re doing) $15
    Raspberry Pi4 aluminum case with dual fans $25
    10Hz GPS $70


    • Requirements

    Raspberry Pi 4 2gb OR Raspberry Pi 3b+
    16GB MicroSD card
    keyboard/mouse

    Windows 7/10, Linux, OSX, *nix.


    • Writing the .IMG file to a MicroSD card

    How to write the .IMG file to a MicroSD Card.


    • Installation, WiFi Direct & WiFi Networking configuration, Transferring Files

    How to install, configure and use PiDash


    • Troubleshooting – Some of this is outdated. 1.5.3.1 has an Updater which handles things.

    Please make sure you READ the post and WATCH THE VIDEO in the link below FIRST.
    How to install, configure and use PiDash

    Slow boot time
    1. If you forget to disable WiFi Direct or WiFi Networking, your PiDash will probably take quite some time to boot up. When you do boot up, minimize or exit TunerStudio and click on Disable Direct or Disable Network. Please use the latest version and the Updater app and make sure Networking options are disabled.

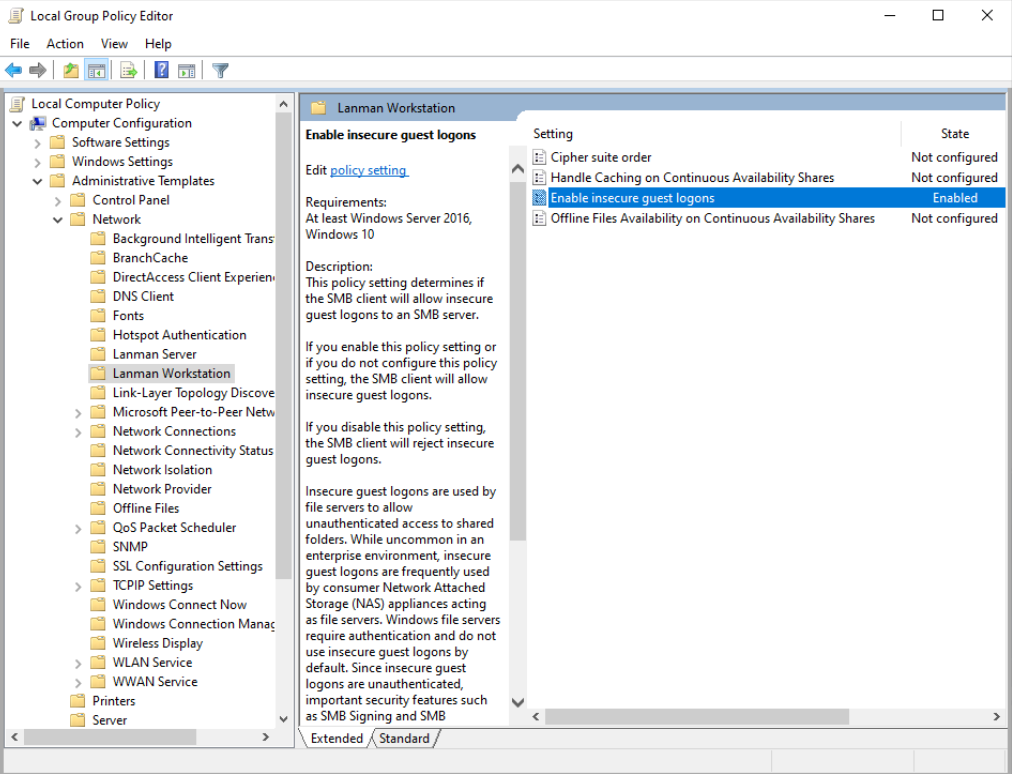
    I cannot see my tunerstudio_share and I’m using Windows 7
    You might need to manually mount if it does not work from File Explorer. You will do it like so:

    net use Z: \\192.168.5.1\tunerstudio_share

    Then head back to File Explorer and find the Z: drive. Double click and there you go. If you already have a Z: drive, pick a letter you dont have, like Y: or X:

    WiFi Networking PRE 1.5.2- I cant connect to my wireless router from PiDash!
    How to Configure/Troubleshoot WiFi Please watch the latest video on how to connect to a network. Use the latest version and the Updater app.

    WiFi Networking 1.5.2 Instructions
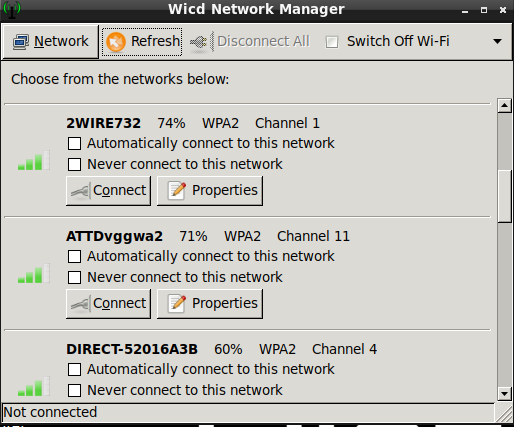
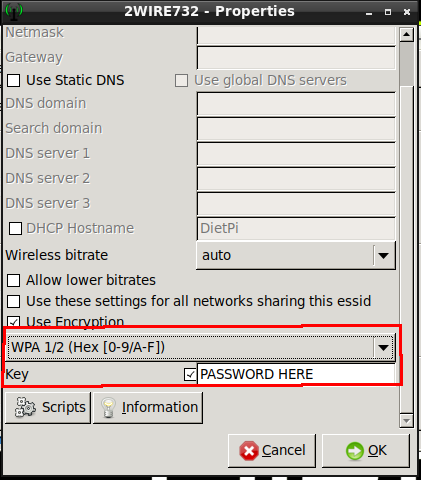
    PiDash Wicd Networking Please watch the latest video on how to connect to a network. Use the latest version and the Updater app.

    Where do I put my Project/Tune Files?
    There is a directory called TunerStudioProjects. This is the only location you should put them in otherwise you may have permissions issues transferring files. Its not a show stopper so I’ll probably fix that next version.

    Why doesn’t my version of TunerStudio auto shut down when I exit TunerStudio?
    TunerStudio Ultra (beta) has a feature where you can set a button on your dash to shut down the PiDash by clicking or touching (if you have a touchscreen) the button. You must configure that manually.
    If you do not have TunerStudio Ultra (beta), you will need to exit TS and click shutdown. I will be making a feature to enable auto-shutdown on TunerStudio exit for the users who do not wish to buy TunerStudio Ultra.

    What if I just power down my PiDash without shutting down with the Shutdown icon?
    Well…the filesystem will probably save your butt on next boot but the problem is, you may lose your datalog you just created.

    What if there is a feature I want, how do I ask for it?
    Email me or post up on the Official PiDash Facebook page.

    My clock is wrong! What gives?
    Unless you have a RTC (Real-Time clock) module, your time will be off. In order to sync the clock, first connect to the network and then click on the Command Line icon (bottom left, black monitor icon) and type the following:
    **You may need to reboot after connecting to the network for this to take effect**
    **If your time doesnt change within 30-40 seconds, reboot WITHOUT clicking on the Disable Networking icon. **

    systemctl start systemd-timesyncd.service
    systemctl daemon-reload

    Then do what you need to do and then disable it.

    systemctl stop systemd-timesyncd.service
    systemctl daemon-reload


    • How to ask for Help

    Join the Facebook page and post public so I can reply.


    • Miscellaneous questions

    I’m running Raspbian/DietPi/Debian and I just want to make your changes to my version. How?
    Most is documented on this site, go thru it. SAMBA, WiFi Direct and WiFi Networking is available via google. Why I configured what I did, too tired to rehash. You’ll need to figure it out.


  • Speeduino Downloads

    Posted on by Alex

    The MegaSquirt3/Pro and Speeduino/SpeedyEFI all use the same binary.

    Speeduino specific Instructions.
    These instructions cover the S E R I A L version.
    Speeduino CANBus plugs into the Seeed Studio CANBus hat. CANL and CANH.

    INSTRUCTIONS:
    1. Download the .zip file here..

    2. Use AVRDUDESS to upload the .hex file to the Arduino Mega. Click here for instructions.

    3. Then you’ll connect like so from the Mega (on the left) to the Speeduino (on the right):
    USB from your computer to the Arduino Mega
    D15-RX3 –> Speeduino TX3 -D14
    D14-TX3 –> Speeduino RX3 -D15

    4. Go to Speeduino’s wiki and ensure Secondary Serial IO is enabled.

    5. Press the SHIFT LIGHT and CONFIGURE your ECU, Warning lights and DEFAULT Layout. If you dont, the dash will not function properly. At the time of this writing, I may create defaults if there are none. Double check them.